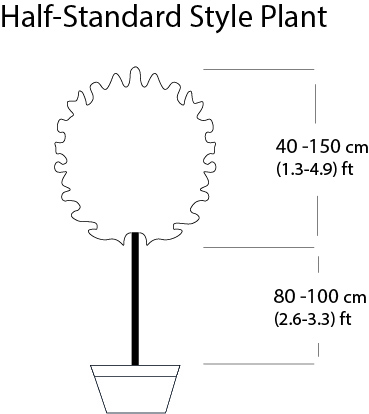
Quercus Ilex (Holm Oak Tree / Holly Oak) – Half-Standard

Product Description
Commonly called the Holly Oak tree, Quercus Ilex often live for more than a thousand years. They are large evergreens with very dense crowns of leaves. They have strong polymorphic leaf of 2 – 9cm long; the younger leaves are wider and have toothed, sharp margins. The colour and texture of the Quercus Ilex varies from hairy, tender and pale green when they first appear to a leathery, dark green, covered in soft white hairs on the underside, when adult. Both male and female flowers are borne on catkins and appear in June, the first ones being the most decorative as they are a soft yellow.

Grows in poor soil, but prefers calcareous, and does not like clay. Will withstand a lack of water in hot, dry summers and tolerates any kind of pruning. These are effective wind breaks, are suited to full sun or shade, good on their own or in groups and resists the salty winds of a sea climate very well, without damage to the beautiful foliage. It has a hardiness rating of H4 making it good for the British climate but better take measures to protect it during extreme cold snaps. It is prone to pests but is generally disease free.

Latin Name: Quercus Ilex
English Name: Holm Oak Tree, Holly Oak
Species: Fagaceae
Genus: Quercus
Foliage Type: Evergreen
Foliage: Green
Fragrance: Flower
Flower: Yellow
Flowering Period: From May to June

Suggested Location: Outdoor.
Suggested Soil Type: Moist but well-drained. Loam, Chalk, Sand
Suggested Exposure to Sunlight: Full Sunlight
Suggested Exposure to Weather: Sheltered or Exposed
Hardiness Rating: Medium (H4)
Lowest Temperature Tolerance: -15°C to -10 °C (5 °F to 23 °F)
Maintenance: Under glass prune to restrict size in spring

Growth Habit: Bushy
Cultivation: An easy to grow evergreen tree that responds well to formative pruning and clipping. Can be used as hedging in coastal areas and is suitable for most sites except the coldest inland areas. Leaf fall can occur in summer
Propagation: Propagate by seed sown in a coldframe or seedbed as soon as ripe or by grafting in mid-autumn or late winter
Suggested planting locations and garden types: Drought Resistant Hedging & Screens Mediterranean Climate Plants Coastal
Pests: Susceptible to aphids and leaf-mining moths
Diseases: Generally disease free

Final Height: 3 m – 5 m (9.8 ft – 16.4 ft)
Final Spread: 2 m – 3 m (6.6 ft – 9.8 ft)
Delivery Cost: This is calculated based on the total size, weight and quantity of your order, as well as the location of your delivery address. You will see the final price at the Online Checkout Page (before making payment) – our website will automatically calculate the lowest possible delivery price and apply discounts to orders of certain products – giving you the best value delivery every time!

Please note that high-volume orders will decrease your delivery costs significantly by spreading the price across multiple items. Visit our Delivery Policy page for more information.

Biofertiliser for Ericaceous 1kg

It is suitable for all the acid/lime hating ericaceous plants and contains a combination of ericoid and arbuscular mycorrhizal fungi. Bio-active plant feed with Root Grow ericoid mycorrhizal fungi and beneficial bacteria is a tailored plant feed for the needs of all acid-loving/lime hating ericaceous plants. When planted directly into the ground ericaceous plants will benefit by being treated for the first 3 – 5 years whilst their root system and fungal partners develop.

Apply it on all pot grown and garden plans to encourage healthy blooms and lush foliage all year round. Apply in spring at the first signs of growth, after flowering and as an autumn top dress.

How to Use

Plants in the ground: Apply 1-2 handfuls (25 – 50g) around the base of the plant, lightly worked into the soil and water well. for larger established plants apply 2 handfuls per square meter under the canopy of the plant.

Container plants and topiary: Apply 2 – 3 handfuls per plant twice yearly. We recommend that once per year 5 – 10cm (2-4 inches) of soil are removed from the top of the pot and replaced with fresh compost. Add 1 – 2 handfuls when replacing the compost to keep your evergreens in prime condition.

Biofertiliser for Ericaceous is not a substitute for using Root Growat time of planting. For new plantings, or in poor soil conditions, we recommend using pure Root Grow ericoid mycorrhizal fungi applied close to the plant’s roots.

Weight: 1 kg

Biofertiliser for Evergreen 1kg

It is ideal for Buxus (box), Bay trees, Camelias, Yew, Conifers and all types of evergreen hedging or garden plants. Bio-active fertiliser with Root Grow mycorrhizal fungi and beneficial bacteria is a targeted plant food tailored to the needs of evergreen plants in the garden.

Evergreens planted directly into the ground benefit from the treatment for the first 3-5 years whilst their soot system and fungal partners develop. For containerised plants apply twice per year.

Apply it on all pot grown and garden plants to maintain lush foliage all year round.

Shake well before use.

How to Use

Plants in the Ground: Apply 1-2 handfuls (25 – 50g) around the base of the plant, lightly worked into the soil and water well. for larger established plants apply 2 handfuls per square meter under the canopy of the plant. For box hedging use 1 good handful for every one meter.

Container plants and topiary: Apply 2 – 3 handfuls per plant twice yearly. We recommend that once per year 5 – 10cm (2-4inches) of soil are removed from the top of the pot and replaced with fresh compost. Add 1 – 2 handfuls when replacing the compost to keep your evergreens in prime condition.

Biofertiliser for Evergreen is not a substitute for using Root Grow  at time of planting. For new plantings, or in poor soil conditions, we recommend using pure Root Grow mycorrhizal fungi applied close to the plant’s roots.

Weight: 1 kg

Biofertiliser for Tree & Shrub 1kg

It is a refined plant feed tailored to the needs of all trees and shrubs. Soil grown plants will benefit by being treated during establishment in the first year whilst their root systems and fungal partners develop.

Apply it on all pot grown and garden plants to encourage healthy blooms and lush foliage all year round. Apply in spring at the first signs of growth, throughout summer as required and as an autumn top dress.

How to Use

Plants in the ground: Apply 1-2 handfuls (25 – 50g) around the base of the plant, lightly worked into the soil and water well. For larger established plants apply 2 handfuls per square meter under the canopy of the plant.

Container plants and topiary: Apply 2 – 3 handfuls per plant twice yearly. We recommend that once per year 5 – 10cm (2-4inches) of soil are removed from the top of the pot and replaced with fresh compost. Add 1 – 2 handfuls when replacing the compost to keep your evergreens in prime condition.

Biofertiliser for Tree & Shrub is not a substitute for using Root Grow at time of planting. For new plantings, or in poor soil conditions, we recommend using pure Root Grow mycorrhizal fungi applied close to the plant’s roots.

Weight: 1 kg

Blue Arizona Cypress (Cupressus Arizonica Fastigiata) – Half-Standard

Product Description
Attractive and resilient, this evergreen tree has eye-catching blueish white foliage.

As its name suggests, the Blue Arizona Cypress is native to the North American states of Arizona and New Mexico, where it enjoys the dry climate. Cypress trees are vigorous-growing evergreens with flaking or scaly bark. The Blue Arizona’s usual shape is a pointed column, or an egg-like oval with a pointed top. Their needle-shaped leaves are aromatic and they grow in dense bunches, giving them a furry appearance.

All conifers are known for their hardiness and resilience against the elements. We often think of them being heavily covered with snow during the winter, but they can look equally as bold and impressive against a bright blue summer sky. Conifers get their name from the “cones” that they produce – which come in all shapes and sizes. Conifer leaves are evergreen and will either be needle-shaped or scale-like.

Latin Name: Cupressus Arizonica Fastigiata
English Name: Blue Arizona Cypress, Blue Ice
Species: Conifer
Genus: Cupressaceae (Cypress)

Foliage Type: Evergreen.
Foliage: Blue-Green and Blue-White
Flower: Brown Cones.
Flowering Period: Spring.

Suggested Location: Outdoor.
Suggested Soil Type: Well-Drained. Chalk. Clay. Loam. Sand.
Suggested Exposure to Sunlight: Full Sunlight.
Suggested Exposure to Weather: Sheltered.
Hardiness Rating: High (H5)
Lowest Temperature Tolerance: -15 °C to -10 °C (5 °F to 14 °F)
Suggested Uses: Embankments, Borders, Large Pots, Specimen, Ornamental.
Maintenance: No pruning required.

Growth Habit: Upright/Teardrop/Pointed-Oval.
Growth Speed: Slow (10cm to 25cm per year).
Final Height: 2 m – 3 m (6.6 ft – 9.8 ft)
Final Spread: 1 m – 1.5 m (3.3 ft – 4.9 ft)

Delivery Cost: This is calculated based on the total size, weight and quantity of your order, as well as the location of your delivery address. You will see the final price at the Online Checkout Page (before making payment). Our website will automatically calculate the lowest possible delivery price and apply discounts to orders of certain products – giving you the best value delivery every time!

Please note that high-volume orders will decrease your delivery costs significantly by spreading the price across multiple items. Visit our Delivery Policy page for more information.

Quercus Ilex (Holm Oak Tree / Holly Oak) – Standard Extra

Product Dimension:

  • Girth 25-30 cm: 285-450 litres pot, trunk – 1200 cm (6.6 ft), crown – 200-250 cm (6.6-8.2 ft);
  • Girth 30-35 cm: 450 litres pot, trunk – 200 cm (6.6 ft), crown – 250-300 cm (6.6-8.2 ft);

Product Description
Commonly called the Holly Oak tree, Quercus Ilex often live for more than a thousand years. They are large evergreens with very dense crowns of leaves. They have strong polymorphic leaf of 2 – 9cm long; the younger leaves are wider and have toothed, sharp margins. The colour and texture of the Quercus Ilex varies from hairy, tender and pale green when they first appear to a leathery, dark green, covered in soft white hairs on the underside, when adult. Both male and female flowers are borne on catkins and appear in June, the first ones being the most decorative as they are a soft yellow.

Grows in poor soil, but prefers calcareous, and does not like clay. Will withstand a lack of water in hot, dry summers and tolerates any kind of pruning. These are effective wind breaks, are suited to full sun or shade, good on their own or in groups and resists the salty winds of a sea climate very well, without damage to the beautiful foliage. It has a hardiness rating of H4 making it good for the British climate but better take measures to protect it during extreme cold snaps. It is prone to pests but is generally disease free. It can grow to a maximum height between 20 m – 25 m (65 ft – 82 ft) and a final spread 15 m – 20 m (49 ft – 65 ft)

Latin Name: Quercus Ilex
English Name: Holm Oak Tree, Holly Oak
Species: Fagaceae
Genus: Quercus
Foliage Type: Evergreen.
Foliage: Green
Fragrance: Flower
Flower: Yellow
Flowering Period: From May to June

Suggested Location: Outdoor.
Suggested Soil Type: Moist but well-drained. Loam, Chalk, Sand
Suggested Exposure to Sunlight: Full Sunlight
Suggested Exposure to Weather: Sheltered or Exposed
Hardiness Rating: Medium (H4)
Lowest Temperature Tolerance: -15°C to -10 °C (5 °F to 23 °F)
Maintenance: Under glass prune to restrict size in spring

Growth Habit: Bushy
Cultivation: An easy to grow evergreen tree that responds well to formative pruning and clipping. Can be used as hedging in coastal areas and is suitable for most sites except the coldest inland areas. Leaf fall can occur in summer
Propagation: Propagate by seed sown in a coldframe or seedbed as soon as ripe or by grafting in mid-autumn or late winter
Suggested planting locations and garden types: Drought Resistant Hedging & Screens Mediterranean Climate Plants Coastal
Pests: Susceptible to aphids and leaf-mining moths
Diseases: Generally disease free

Final Height: Higher than 12 m (39.4 ft)
Final Spread: Wider than 8 m (26.2 ft)
Delivery Cost: This is calculated based on the total size, weight and quantity of your order, as well as the location of your delivery address. You will see the final price at the Online Checkout Page (before making payment) – our website will automatically calculate the lowest possible delivery price and apply discounts to orders of certain products – giving you the best value delivery every time!

Please note that high-volume orders will decrease your delivery costs significantly by spreading the price across multiple items. Visit our Delivery Policy page for more information.

Care and Maintenance Advice for Ornamental Grasses

Ornamental Care and Maintenance

Ornamental grasses can add vibrant accents to your existing plants and have a multitude of purposes for our gardens.  They can be used to add textures to flower beds and borders, create edging, soften hardscapes or grow a prairie garden.  With a full spectrum of colour varieties available, most grasses are easy to care for and highly versatile.  Like all garden plants, proper selection for gardening conditions and choosing which species complement each other will add colour and vibrant texture that flows with the breeze.

These grasses are all relatively low maintenance, free of disease and pests and add will add a distinctive character and personality to your garden.

Ornamental Grass Planting Advice

Our nursery only grows resilient and hardy potted varieties and can be planted year round as long as the soil is not frozen or waterlogged.  If planting in late autumn it is best to plant before the first frost.

Plant Spacing 

As a good rule of thumb is to space plants proportionate to how tall they are at maturity.  For example, if the plant will reach 1 meter at maturity, plant them 1 meter apart.  For larger varieties like Cortaderia (Pampas) place plants 2 m (6ft) apart.  

  • Plant height 50-100cm (20-40in)   -recommended 6 plants per linear meter
  • Plant height 100-150cm (40-60in) -recommended 4 plants per linear meter
  • Plant height 150-200cm (60-80in) -recommended 3 plants per linear meter
  • Plant height 200-250cm (80-100in) -recommended 2 plants per linear meter
  • Plant height 250-300cm (100-120in) –recommended 1-2 plants per linear meter
  • Plant height 300-350cm (120-140in) –recommended 1-2 plants per linear meter 

Ground Preparation

  1. It is always best to measure twice and cut once, so use planning line and canes to plot out your location. Start by removing all turf above the immediate area before planting.
  2. Remove all vegetation from the immediate planting area before you begin digging.
  3. Using a gardening fork, till up the soil thoroughly twice as deep as container the plant was shipped in. If available, you can also use a petrol powered tiller. This is important as uncultivated soil can restrict plant growth and not let the roots establish. Make sure and remove any large rocks.

Day of Planting

Plant your new Ornamental grass

  1. Place a landscaping tarp parallel to the planting area and dig an area twice as wide as the shipping container and just as deep, place soil on the tarp after removal. If necessary, use the container itself as a guide.  For Cortaderia (Pampas) Dig holes that are 3 times as deep and wide as the root ball to encourage spreading.
  2. Mix the native soil that is to be backfilled 1-1 with Planting Compost. If you have heavy soil and drainage is a problem, consider amending with Horticultural Gravel.
  3. Carefully remove the plant from the pot and break up the bottom edges of the rootball taking care to unfurl and tease out the roots from the base so that they will establish in the soil. Tap the side of the pot with your hand if the rootball is being stubborn and will not remove easily.  Then gently place the plant upright into the hole, packing the surrounding soil around the root ball to keep the plant in the desired position make sure to plant at the root line.
  4. Water the soil around the plant thoroughly, make sure the soil is very moist but don’t use so much water that puddles form. Water bi-weekly for the first month and weekly for the next two months.  Subsequent watering should only be necessary during extended dry spells.

Container Planting

  1. Make sure the pot is wide enough to accommodate arching grass blades and has proper drainage. A lighter, unglazed pot will evaporate excess moisture better than darker, glazed pots.
  2. Cover the drainage holes with a screen to prevent clogging. Add a bottom layer of Horticultural Gravel but make sure to cover with a layer of soil so the roots do not directly touch the gravel.
  3. Use a 1-1-1 mix of Planting Compost, Horticultural Gravel, and native topsoil to ensure the plant has proper nutrition and drainage.
  4. After removing the plant from the shipping container, plant at rootball depth and pack the surrounding area with 1-1-1 mix. Pack firmly enough for positioning, but not so tight that root growth is restricted.
  5. Water thoroughly after planting until water comes out of the drainage holes but do not waterlog.

Ornamental grasses are very hardy and will establish strong roots if planted properly adding charm and character to your garden.

Ornamental Grass Trimming Advice

There are two main categories of Ornamental Grasses; evergreen and deciduous.  While deciduous grasses will need to be cut back annually, evergreens will just need to be trimmed up.  

Deciduous Grasses

  • Some varieties like Cespitosa Goldtau need to be trimmed all at once at 3cm (1in) above ground level before growth start in early spring (mid-March to April). Prune Miscanthus at the same time, but individually remove the shoots with secateurs so as not to sever the newly forming green shoots.
  • While Stipa Tenuissma is classified as deciduous, it will tend to have evergreen traits in some gardens. If there are low amounts of dead material building up, simply comb out the loose foliage as you would an evergreen.  If it takes deciduous traits and foliage dies off uniformly, fully cut back in spring. 

Evergreen Grasses 

  • Do not cut back evergreen varieties like Carex (Sedges) all at the same time. Cut off spent stalks and individually remove diseased or unsightly leaves.
  • Cortaderia (Pampas) does benefit from hard pruning in early spring.  Cut back vigorously, but take care not to damage new growth.  Wear eye protection and gloves, leaves can be sharp.  Use loppers to sever stubborn stems.

Ornamental Grass Watering Advice

Automatic irrigation systems are preferred.  Water your new plants bi-weekly for the first month after planting and weekly for the next two months.  If in doubt, use the finger test and push your finger into the ground.  If it is dry, add water and if it is moist do not. Remember you want the ground moist but not so much that puddles form.  Subsequent watering should only be necessary during extended dry spells, unnecessary watering can leave to droopy, unsightly form.

Container based plants will require regular watering but allow the soil to dry out to a depth of several inches before watering again.

Ornamental Grass will prosper with a little effective initial watering allowing the root system to establish and the plant to thrive.

Ornamental Grass Feeding Advice

Unlike other perennials and shrubs, ornamental grasses do not normally require fertilizer, and too much nitrogen can deter foliage growth and give them a floppy, dishevelled look.  If you feel feeding them is necessary, choose a balanced, slow release fertilizer at ½ strength in early spring.

For container based plants, a spring fertilizer treatment is necessary since they have limited nutrition.  A balanced 10-10-10 fertilizer is best, follow manufacturer’s instructions.

Your new Ornamental Grass will require little feeding to thrive and prosper in your garden.

Care and Maintenance Advice for Hedging Plants

Hedging General Maintenance and Care Advice

Hedging is a functional and beautiful addition to any garden and can be used as a windbreak barrier or to create a privacy screen and is a wonderful ornament for the layout of your garden.  When adding a new a new hedge to add to your landscape there are several factors to take into consideration such as soil type, light conditions, growth speed, exposure and desired level of maintenance.

  • Leylandii, Thuja and Conifers are hardy species that can endure windy, exposed conditions.
  • Most varieties can endure partial shade; however Laurel, Firethorn and Box Faulkner will thrive in fully shaded conditions.
  • Holly and firethorn and are beautiful varieties that offer Security Hedging (hedging with thorns to discourage intruders).
  • If you want a colourful hedge, consider Heavenly Firepower, Red Robin, Pink Marble or Golden Leylandii.
  • Thuja is low maintenance choice that does not require frequent side trimming and thrives in most soil types and exposed areas making it great selection for privacy or a windbreak barrier.

With some thoughtful selection while taking garden conditions into consideration your new hedging will define boundaries, create structure and provide you with a lifetime of lush foliage.

Hedging Planting Advice

Although pot-grown hedging can be planted year-round providing the ground is not waterlogged or frozen, there are some seasonal recommendations.  Evergreen hedges are best planted in early autumn and deciduous hedges establish better mid-autumn or late winter when the leaves have fallen while they are dormant.  However, if you are planting evergreens at a windy and exposed area April to early May is preferable so the frigid winds do not dry out the new pant during the winter.

Plant Spacing 

  1. Plant height 50-100cm (20-40in)   -recommended 6 plants per linear meter
  2. Plant height 100-150cm (40-60in) -recommended 4 plants per linear meter
  3. Plant height 150-200cm (60-80in) -recommended 3 plants per linear meter
  4. Plant height 200-250cm (80-100in) -recommended 2 plants per linear meter
  5. Plant height 250-300cm (100-120in) –recommended 1-2 plants per linear meter
  6. Plant height 300-350cm (120-140in) –recommended 1-2 plants per linear meter

Ground preparation

  1. Ideally ground preparation starts 4-6 weeks before planting, using canes and planting line mark an area 60 cm (2ft) wide for a single row hedge and 90 cm (3ft) and separated by 40 cm (16in) for a double row hedge.
  2. Spray a non-residual weed killer on the trench area according to the manufacturer’s instructions.
  3. Generally it is recommended to lay Planting Compost 5-8cm (3-5 in) over the immediate planting area and thoroughly mix it in with the soil with a gardening fork as deep as your spade will go after removing the top layer of vegetation before planting. If needed, amend the soil with Horticultural Gravel to improve drainage.

Day of planting

  1. After laying a gardening tarp parallel to the trench, remove the top layer of vegetation. Then dig the trench 30 cm (1ft) deep and place the soil on the tarp, remove rocks and break up the soil extensively so the roots can establish properly. If drainage is an issue, dig ½ to ¼ deeper and cover the bottom of the hole with Horticultural Gravel, but make sure to cover the gravel with a layer of soil so that the roots do not directly touch it.
  2. Mix the backfill with 1-1 with Planting Compost and native soil, but remember ericaceous plants need ericaceous compost. Sprinkle a handful of fertilizer into the mix.
  3. Keep the rootball well watered before planting, preferably soaking it in a bucket of water 2-4 hours before being planted.
  4. After removing the hedging from the shipping container use a planting line and measuring stick for even spacing, plant the root balls at the same depth as the root line. Pack the area immediately around the root balls to keep them in an upright position.
  5. After filling in the trench with the backfill, firm the soil down using your foot. Remember you are only firming the soil down; avoid stamping the soil into the hole.
  6. Water the soil thoroughly but do not waterlog.
  7. Cover the freshly planted soil with 2-3 inches of Mulching, keeping a3-5cm (1-2in) ring around the base to make sure the mulching does not touch the root.
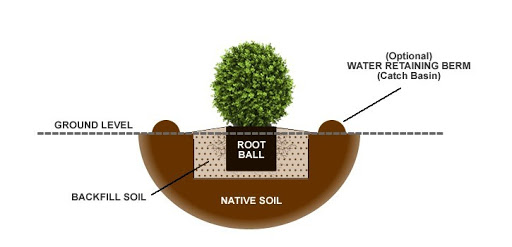
Proper planting will ensure your new cultivar will successfully establish, providing solid root structu re and a healthy plant.

Hedging Trimming Advice

Your new hedge will require formative pruning after it is planted for the first two years at various times depending on species.  While it is important for top shoots in your new hedge to grow until it reaches the desired height while trimming the side shoots during the growing season will encourage thick and lush new growth.  It is best advised to keep a formal hedge no wider than 60 cm (24 in) and slightly tapered upwards to allow the bottom area to receive ample sunlight.

  • Keeping a straight edge is difficult, so we recommend using a string for a guide.
  • Complex hedge shapes such as domed, crenulated or pitched forms can be aided with a cardboard template.
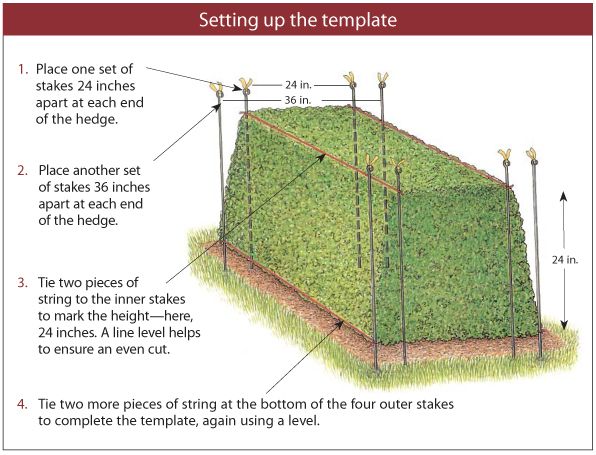
Hand shears and pruners are generally the best options for smaller hedges and are more effective on difficult branches.  They are also quieter, less expensive, and a safer alternative to power shears.  However, if you have a larger hedge or garden a power shear may be required for the sake of time and efficiency.  Electric trimmers are much lighter than petro-powered models, but mind the cord or consider one of the new cordless models.

  • Preferably cut on a cloudy day to avoid scorching.
  • Keep your tools sharp and wash them in between plants to avoid the spread of disease
  • Yew should be trimmed once a year in August or September and pruned in August to limit overall size.
  • Privet should be trimmed twice per year, generally from May to August. The more you trim it the denser and thicker it will grow in, making it easier to keep a uniform size.  Prune hard in April for size reduction if necessary.
  • Laurel is best cut in July or August, and hard spring pruning can be used to limit size.
  • Box should be trimmed twice per year, preferably in May and September-October.
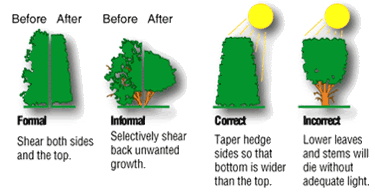
The best times of year for trimming depends on the cultivar, but take care to not disturb birds during the March to August nesting season.  With hedging, a little proper and effective maintenance will enrich your plants providing rich, full foliage for decades.

Hedging Watering Advice

Regular watering for 2-4 weeks immediately after planting is essential.  If using a watering can, 5 litres (1.5 gal) for every meter of hedging.  An automatic irrigation system is preferable, effective an inexpensive; it is laid next to the base of the hedging and turned on for 2-4 hours.

  • Water in the evening or when cloudy so the moisture does not evaporate.
  • Water every 2-3 days for the first 4 weeks after planting and every week for the first year of planting. After the first full year the roots should establish themselves and not require frequent watering but take care to water during extended dry spells, even during winter dormancy.

Proper watering will allow the roots of your new hedging to establish correctly, resulting in a healthy plant that will enliven your garden for decades to come.

Hedging Feeding Advice

Feed your new hedges several times per year with a good slow release fertilizer in spring, using about 70-80 grams (2-3 OZ) per square meter.  Fertilizer needs to seep down into the rooting system, so a good time to fertilize is after a rainfall.  After application, cover the planting area with a 5-8 cm (2-3 in) of Mulching and refresh mulch regularly as needed.

A good layer of mulch will also deter weed growth but most importantly it enriches the soil. With nourishment, your new hedging will reward you with healthy, full and dense foliage and a gorgeous garden environment.

Care and Maintenance Advice for Topiary

Topiary General Maintenance and Care Advice

The horticultural practice of topiary is the art of training perennial plant foliage into ornamental shapes and forms ranging from spirals and cubes to animals and architecture. These living sculptures are a vibrant addition to any garden and can be used to accentuate your landscape and create a showcase of botanic art. Topiary is currently enjoying a resurgence of popularity amongst gardeners and is becoming one of the hottest trends of gardening and landscaping.  Geometric shapes like cones and balls may be used to streamline landscape and highlight architecture.  Whimsical creations such as horses, and squirrels will add a “wow” factor to your garden and become a conversational piece as well as fostering children’s interest in gardening.  Our collection ranges from traditional varieties such as English Yew and Holly to vibrant contemporary additions like Blue Arizona Cypress.

When selecting the addition of a new topiary to your garden it is important to consider which species are best suited for your garden conditions and level of maintenance.  For example, Ligustrum Jonandrum  will require more frequent trimming than English Yew.   Likewise, Box Faulkner will prosper in partial or full shade while Thuja requires full sunlight.

Proper selection and consideration for garden conditions will provide your new topiary with provide it with an enriching environment and in turn it will add a new aesthetic balance and character to your garden.

Topiary Planting Advice

Like all evergreens topiaries are hardy and resilient and can be planted year round providing the ground is not frozen or waterlogged. However there are some seasonal recommendations to consider.  Preferably topiaries are planted in early spring or late autumn during periods consisting of cooler temperatures and moderate to consistent rainfall.  After you receive your new topiary, keep the root ball watered properly until the day of planting.

Plant Spacing

  1. Choose a design that fits into the landscaping design of your garden and take the plant’s eventual growth into consideration.
  2. If planted next to a building, take eventual growth and trimming into consideration.

Ground Preparation

  1. Prepare an area twice the diameter of the shipping container 4-6 weeks before digging.
  2. Spray a non-residual weed killer on the planting area; take care not to get any unintended overspray on any surrounding vegetation.
  3. Generally it is recommended to lay Planting Compost 5-8cm (3-5 in) over the immediate planting area and thoroughly mix it in with the soil with a gardening fork as deep as your spade will go after removing the top layer of vegetation before planting. If needed, amend the soil with Horticultural Gravel to improve drainage.

Day of Planting 

  1. Dig a hole twice the diameter of the pot and just as deep. Gently spike the bottom of the hole with a garden fork to encourage downward root growth, this is especially important with clay soils and will prevent the roots circling in on themselves.  If drainage is an issue, dig ½ to ¼ deeper and cover the bottom of the hole with Horticultural  Gravel, but make sure to cover the gravel with a layer of soil so that the roots do not directly touch it.
  2. Carefully remove the plant from the pot and gently unfurl and tease out the roots from the base so that they will establish in the soil. Tap the side of the pot with your hand if the root ball is being stubborn and will not remove easily.
  3. Place the plant in the hole in a proper upright position with top part of the root ball slightly below ground level, approximately 5 cm (2in). Take a couple of steps back during positioning and look to make sure that the plant is straight.
  4. After the plant is positioned properly, fill the area surrounding the hole halfway with a 50/50 mixture of native topsoil and planting compost. Fill the hole with water and allow the water to percolate down into the soil before filling in the remaining 50/50 mixture to ground level. This will allow the soil to bond with the roots and eliminate any air pockets.  Then fill in the remaining soil and water fully until moist but do not waterlog.
  5. Once backfilling is complete, tamp down the ground with your boot and make sure that you are just firming down the ground and not pushing down the soil.
  6. Apply 5-8 cm (2-3 in) of mulch around the topiary’s base, but do not allow the bark to touch the base keeping a 3-5cm (1-2in) ring around the trunk as this could cause a fungal infection. Water your new topiary every other day for the first two weeks after planting and then regularly for the first 3-6 months until the roots are established.

Growing a Topiary in a Container

 Medium and small sized cultivars are well suited for potting and are wonderful at accentuating architecture and livening up patio space. If being planted individually, select a pot with drainage that is approximately 20% larger than the previous one to keep everything proportionate.

  1. Place a screen over the drainage holes and add Horticultural Gravel to the bottom of the container to improve drainage and lower the centre of gravity. Add a good layer of compost over the gravel so the rootball does not touch it.  When selecting compost, ericaceous compost is essential for acid-loving plants but multi-purpose is suitable for most varieties.
  2. Position the plant so the rootball is 5cm (2in) from the lip and gradually add compost while firming around the sides until the top of the rootball is slightly covered.
  3. Water fully until water comes out of the drainages holes. Water 2-3 times per week for the first several weeks and then once per week for next 2-3 months. For further watering, place your finger 5-8cm (2-3in) deep and water if the soil feels dry.  Do not overwater.
  4. Topdress with Mulching or Decorative Aggregate.
  5. While most maintenance is similar to growing plants in the ground, special attention must be paid to feeding and watering in the summer months.

Take care to provide your new topiary with an opportune planting area and it will properly establish.

Trimming and Shaping Advice

Here at Garden Plants we recommend the first yearly trimming in April-May and the second mid-September just like we do at our nursery. This will encourage growth and create denser, fuller foliage and a healthier plant. Ideally trim on a cloudy, dry day as cutting in the full sun can scorch the leaves and cutting when wet is not recommended as it can encourage blight. Your new topiary should be allowed one full growing season before a hard pruning.

  • When shaping, take a couple of steps back periodically to keep focus on the topiary’s overall shape and form.
  • A little and often approach will produce the best results barring the biannual trims.
  • Clipping tools will range from draw-cut pruners and hand shears to electric shears depending on project size.
  • Wash shears between plants to prevent the spread of disease, keep them sharp and store in a dry room to prevent rust.

After trimming, go through with your hands and gently pull out the foliage and stems, fluffing up the shape and form.  With minimal but effective maintenance, your new topiary will provide a sense of personality and panache to your garden.

Topiary Watering Advice

Daily watering for the first two weeks after planting is essential so that the plant may establish its roots.  For the next 3-12 weeks water every 2-3 days and after 3 months water on a weekly basis for the first growing season.  Take care to water your topiary at ground level as too much sunlight can burn the foliage.  For ground planted topiaries, leave the hose at the base of each plant on a slow flow for ½ hour, this will encourage deeper roots and a healthier overall specimen.

  • Container based plants will require more frequent watering over the summer months since potted soil will not retain moisture as well as the ground.
  • An automatic irrigation system is recommended.

In order to establish its roots properly, your new hedging will require proper watering and minimal yet regular maintenance.  It will reward your efforts with lush, dense foliage and a healthy plant.

Topiary Feeding Advice

Mulching is recommended in late winter after fertiliser application to conserve moisture.  Mulching also creates an insulation layer keeping the roots warmer in the winter and cooler in the summer. Remember to leave a 3-5cm (1-2in) ring between the mulch and the trunk to create a buffer zone from infection.  Feed each plant 3-4 times throughout the growing season with a good slow release fertilizer, only 70g (2oz) per square meter  after a rainfall so it seeps down and nourishes the roots.

Quercus Ilex (Holm Oak / Evergreen Oak) – Roof Shaped

Product Description
Commonly called the Holly Oak tree, Quercus Ilex often live for more than a thousand years. They are large evergreens with very dense crowns of leaves. They have strong polymorphic leaf of 2 – 9cm long; the younger leaves are wider and have toothed, sharp margins. The colour and texture of the Quercus Ilex varies from hairy, tender and pale green when they first appear to a leathery, dark green, covered in soft white hairs on the underside, when adult. Both male and female flowers are borne on catkins and appear in June, the first ones being the most decorative as they are a soft yellow.

Grows in poor soil, but prefers calcareous, and does not like clay. Will withstand a lack of water in hot, dry summers and tolerates any kind of pruning. These are effective wind breaks, are suited to full sun or shade, good on their own or in groups and resists the salty winds of a sea climate very well, without damage to the beautiful foliage. It has a hardiness rating of H4 making it good for the British climate but better take measures to protect it during extreme cold snaps. It is prone to pests but is generally disease free.

Height : 250 cm
Girth : 24 – 27 cm
Size : 150 x 150 cm

Latin Name: Quercus Ilex
English Name: Holm Oak Tree, Holly Oak
Species: Fagaceae
Genus: Quercus
Foliage Type: Evergreen.
Foliage: Green
Fragrance: Flower
Flower: Yellow
Flowering Period: From May to June

Suggested Location: Outdoor.
Suggested Soil Type: Moist but well-drained. Loam, Chalk, Sand
Suggested Exposure to Sunlight: Full Sunlight
Suggested Exposure to Weather: Sheltered or Exposed
Hardiness Rating: Medium (H4)
Lowest Temperature Tolerance: -15°C to -10 °C (5 °F to 23 °F)
Maintenance: Under glass prune to restrict size in spring

Growth Habit: Bushy
Cultivation: An easy to grow evergreen tree that responds well to formative pruning and clipping. Can be used as hedging in coastal areas and is suitable for most sites except the coldest inland areas. Leaf fall can occur in summer
Propagation: Propagate by seed sown in a coldframe or seedbed as soon as ripe or by grafting in mid-autumn or late winter
Suggested planting locations and garden types: Drought Resistant Hedging & Screens Mediterranean Climate Plants Coastal
Pests: Susceptible to aphids and leaf-mining moths
Diseases: Generally disease free

Delivery Cost: This is calculated based on the total size, weight and quantity of your order, as well as the location of your delivery address. You will see the final price at the Online Checkout Page (before making payment) – our website will automatically calculate the lowest possible delivery price and apply discounts to orders of certain products – giving you the best value delivery every time!

Please note that high-volume orders will decrease your delivery costs significantly by spreading the price across multiple items. Visit our Delivery Policy page for more information.

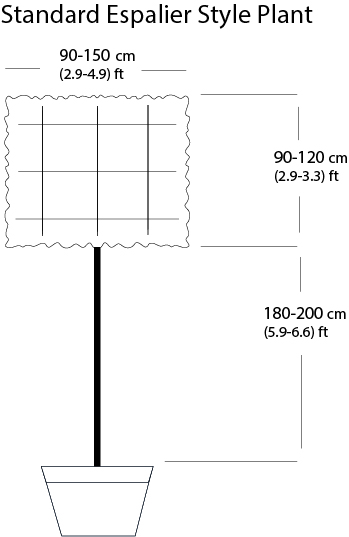
Quercus Ilex (Holm Oak / Evergreen Oak) – Standard Espalier

Product Dimension:

  • Girth 10-12 cm: 35-50 litres pot, Trunk – 180-200 cm (5.9-6.6 ft), Trellis – W120 x H90 cm (3.9 x 3.0 ft);
  • Girth 12-14 cm: 50 litres pot, Trunk – 180-200 cm (5.9-6.6 ft), Trellis – W120 x H90 cm (3.9 x 3.0 ft);
  • Girth 14-16 cm: 50 litres pot, Trunk – 200 cm (6.6 ft), Trellis – W140 x H120 cm (4.6 x 3.9 ft);
  • Girth 16-18 cm: 70 litres pot, Trunk – 200 cm (6.6 ft), Trellis – W140 x H120 cm (4.6 x 3.9 ft);
  • Girth 18-20 cm: 110 litres pot, Trunk – 200 cm (6.6 ft), Trellis – W140 x H120 cm (4.6 x 3.9 ft);
  • Girth 20-25 cm: 130 litres pot, Trunk – 200 cm (6.6 ft), Trellis – W140 x H120 cm (4.6 x 3.9 ft);

Product Description
Commonly called the Holly Oak tree, Quercus Ilex often live for more than a thousand years. They are large evergreens with very dense crowns of leaves. They have strong polymorphic leaf of 2 – 9cm long; the younger leaves are wider and have toothed, sharp margins. The colour and texture of the Quercus Ilex varies from hairy, tender and pale green when they first appear to a leathery, dark green, covered in soft white hairs on the underside, when adult. Both male and female flowers are borne on catkins and appear in June, the first ones being the most decorative as they are a soft yellow.

Grows in poor soil, but prefers calcareous, and does not like clay. Will withstand a lack of water in hot, dry summers and tolerates any kind of pruning. These are effective wind breaks, are suited to full sun or shade, good on their own or in groups and resists the salty winds of a sea climate very well, without damage to the beautiful foliage. It has a hardiness rating of H4 making it good for the British climate but better take measures to protect it during extreme cold snaps. It is prone to pests but is generally disease free.

Latin Name: Quercus Ilex
English Name: Holm Oak Tree, Holly Oak
Species: Fagaceae
Genus: Quercus
Foliage Type: Evergreen.
Foliage: Green
Fragrance: Flower
Flower: Yellow
Flowering Period: From May to June

Suggested Location: Outdoor.
Suggested Soil Type: Moist but well-drained. Loam, Chalk, Sand
Suggested Exposure to Sunlight: Full Sunlight
Suggested Exposure to Weather: Sheltered or Exposed
Hardiness Rating: Medium (H4)
Lowest Temperature Tolerance: -15°C to -10 °C (5 °F to 23 °F)
Maintenance: Under glass prune to restrict size in spring

Growth Habit: Bushy
Cultivation: An easy to grow evergreen tree that responds well to formative pruning and clipping. Can be used as hedging in coastal areas and is suitable for most sites except the coldest inland areas. Leaf fall can occur in summer
Propagation: Propagate by seed sown in a coldframe or seedbed as soon as ripe or by grafting in mid-autumn or late winter
Suggested planting locations and garden types: Drought Resistant Hedging & Screens Mediterranean Climate Plants Coastal
Pests: Susceptible to aphids and leaf-mining moths
Diseases: Generally disease free

Delivery Cost: This is calculated based on the total size, weight and quantity of your order, as well as the location of your delivery address. You will see the final price at the Online Checkout Page (before making payment) – our website will automatically calculate the lowest possible delivery price and apply discounts to orders of certain products – giving you the best value delivery every time!

Please note that high-volume orders will decrease your delivery costs significantly by spreading the price across multiple items. Visit our Delivery Policy page for more information.

January fundamental tasks for your Garden Plants

January is a very cold month as we are on the  middle of the winter. For all of us January is the month to start a new period of life with a lot of new objectives.

Why not start the 2016 taking more care about your garden and cultive a beautiful Garden Plants on it?

We understand the last thing that you are thinking to do is going outside a normal day snowing with a temperature minus 0 and with the darkness of the short days it can be very hard. If you want to take pleasure in your garden and enjoy the rest of the year you must do this effort. It will be more easy stay at home lying on the couch with a blanket and watching a movie. But remember if you want to achieve your goals and our garden produce beautiful results in spring you have to be consistent and work hard.

Basically January tasks you should not neglect are those of maintenance, such as pruning and planting new plants.

General information

  • If it not freezes you must irrigate regularly fences especially this one’s with evergreens.
  • After a huge snowing is recommendable take out the snow of bushes, especially of the conifers to avoid that branches will break.
  • The month of January is ideal to put on anti-pest on trees and with that avoid pests.
  • Avoid and remove the leaves of Autumn around plants of early flower.
  • The most important start to think what you want to plant to your garden and how you want that looks like next season. January you can plant trees and deciduous shrubs but as long as the ground is not cold or wet. You can also plant seasonal flowering plants.
  • We should never prune plants that bloom in winter, flower production could be affected and it is always recommendable to prune after flowering.
  • In very cold areas, where there are frequent frosts, it is recommended to postpone pruning until winter is over, as wetness could penetrate and damage the plant.
  • Compost the yew-tree, boxwood, holly.
  • Is recommendable put a little bit more of turf on hydrangeas.
  • It is time to plan our plantings for the arrival of the spring that is the season that flowers start to flourish. Remember it is the ideal time to plant fruit trees and roses.
  • The cold causes hardening of the substrate, is important keep fluff and padding with pine bark to prevent is compacted.

Remember the first month of the year is very important to make your garden look perfect when spring arrives.

An old proverb says: “The best time to plant a tree was 20 years ago, the second best time is now.”